

If you’ve noticed your Calgary driveway near the Bow River pathway looking flaky, or your garage floor in a community like Tuscany has started to pit, you’re dealing with a classic local problem: concrete spalling. It’s the frustrating sight of your concrete surface chipping, peeling, or crumbling away. This step-by-step guide will walk you through exactly how to repair spalling concrete, whether you’re a determined homeowner in Seton or a commercial property manager in the Beltline.
While a small patch job is a manageable DIY project, understanding the full process helps you decide when to call in a pro. Here’s exactly how to do it, step by step, to restore your concrete’s strength and appearance.
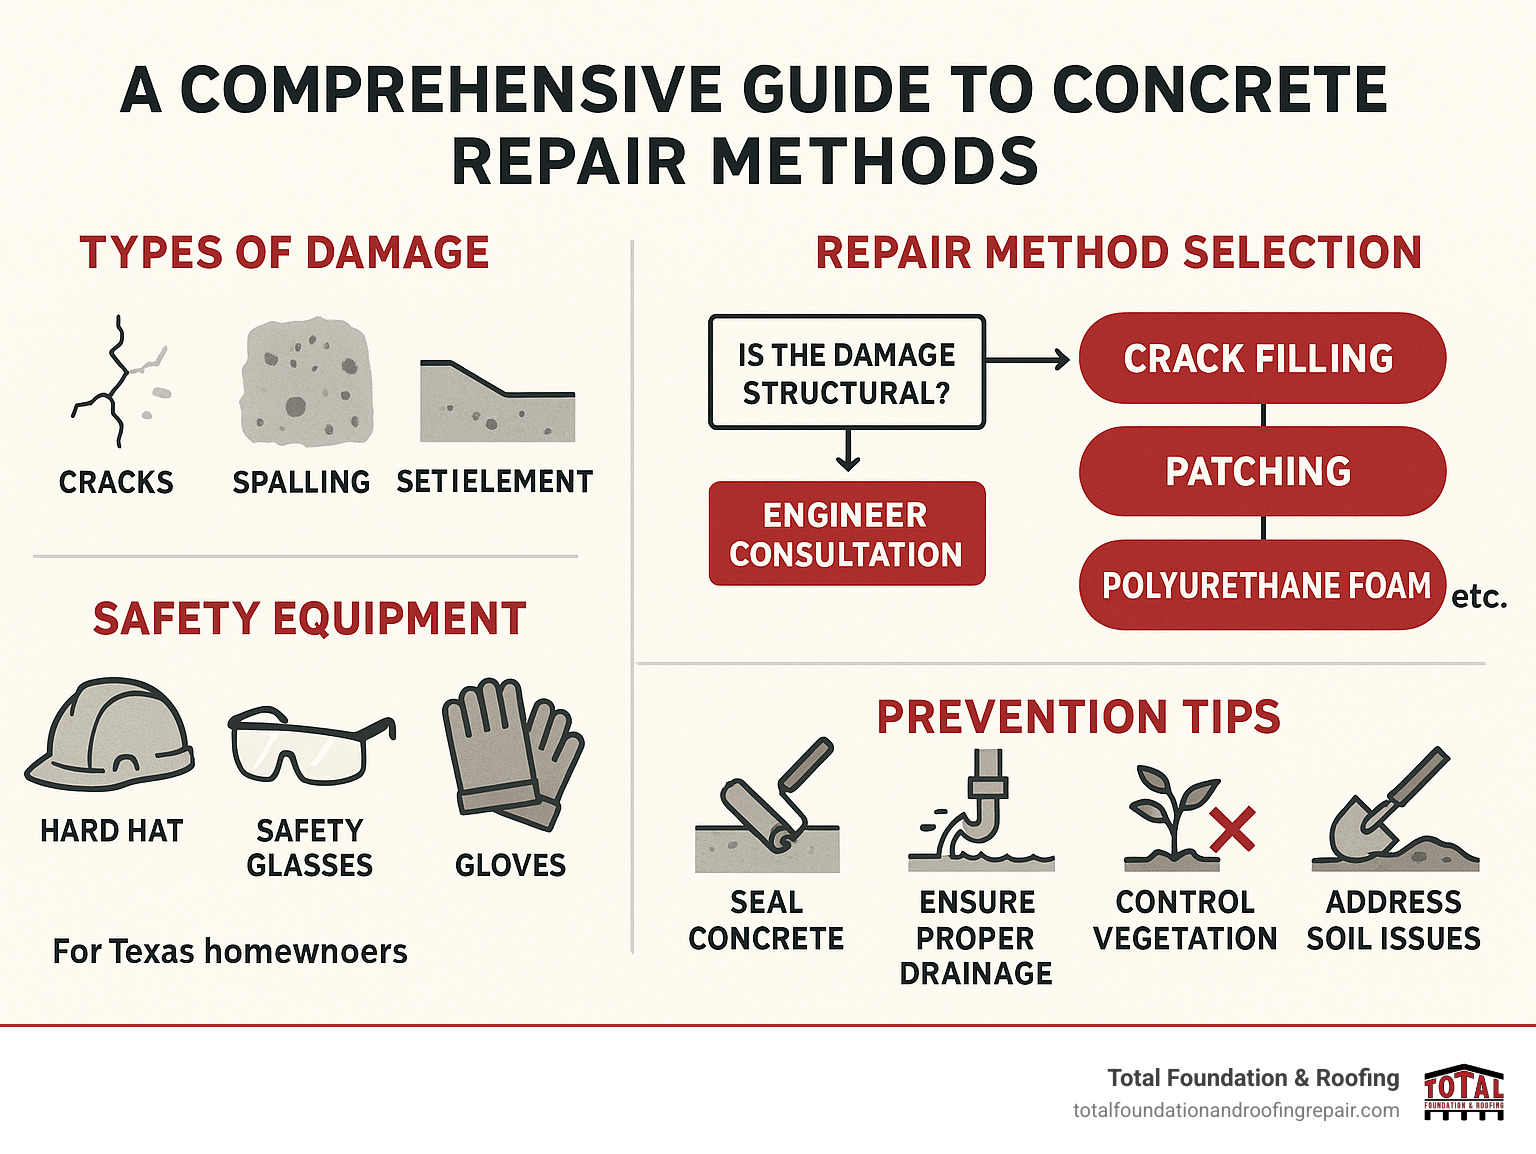
What is Concrete Spalling?
Concrete spalling, sometimes called scaling, is the breakdown of a concrete surface. It starts as small pits and can progress to larger areas where the top layer flakes off, exposing the rough aggregate or even the steel reinforcement bars (rebar) beneath. Think of it like concrete’s version of severe dry skin, but with serious structural implications if left unchecked.
This isn’t just a cosmetic issue. When the protective surface layer fails, it opens the door for water, de-icing salts, and other corrosive elements to penetrate deeper. Over time, this can lead to more extensive damage, especially to the critical steel that gives concrete its tensile strength.
Bottom line: Spalling is a sign your concrete’s defenses are down and needs immediate attention.
Signs and Symptoms of Spalling Concrete
Knowing what to look for is the first step. Early signs are often subtle but become more pronounced with each freeze-thaw cycle. You might see a network of fine, shallow cracks (called crazing) that look like a spiderweb across the surface.
More advanced symptoms include visible pits or small holes where the sandy paste has eroded away, leaving the larger stones exposed. In severe cases, you’ll see chunks of concrete flaking off, creating rough, crater-like areas. If you see rust-colored stains, that’s a telltale sign the rebar inside is corroding and actively forcing the concrete apart from within.
Causes of Concrete Spalling
Concrete is tough, but it’s not invincible. In Calgary, the primary culprit is almost always our dramatic climate. The relentless cycle of freezing at night and thawing during the day, especially from October through April, puts incredible stress on concrete. Water seeps into tiny pores, freezes, expands, and literally pushes the surface apart from the inside.
Beyond the weather, the initial installation plays a huge role. A weak surface from over-troweling or adding too much water to the mix (which contractors call “bleed water”) creates a porous, fragile top layer that can’t withstand pressure. Using de-icing salts accelerates the damage by lowering the freezing point of water, allowing more frequent freeze-thaw cycles and introducing corrosive chemicals.
Common Triggers Like Moisture, Freeze-Thaw, and Corrosion
These three factors often work in a destructive partnership. Moisture finds its way in through hairline cracks or a poor seal. Calgary’s freeze-thaw cycles then use that water as a wedge to crack and lift the surface. Once the concrete is compromised, moisture reaches the steel rebar, causing it to rust.
Rust occupies more volume than the original steel, creating tremendous internal pressure that pops the concrete cover right off. It’s a vicious cycle: water causes freeze-thaw damage, which allows more water in to cause corrosion, which causes more spalling.
How to Identify Concrete Spalling
Proper identification means distinguishing spalling from other issues like cracking or settlement. Grab a wire brush and a flashlight. Start by brushing away any loose debris from the suspect area. Spalling will feel and look like the surface is disintegrating, revealing a rough, sandy texture or aggregate underneath.
Tap the area with a hammer or the handle of a screwdriver. Solid, healthy concrete will give a sharp, ringing sound. Spalled concrete will sound dull and hollow, indicating a loss of bond beneath the surface. Also, check for the “ring of rust” around exposed rebar or rust streaks bleeding out from cracks.
If tapping reveals large hollow-sounding areas, the damage is likely deeper than a simple surface fix.
When to Repair vs. Replace Spalled Concrete
This is the million-dollar question for any property owner along Memorial Drive. The decision hinges on the extent of the damage. As a general rule, if the spalling is less than 1/3 of the slab’s thickness and the underlying concrete is sound, repair is a viable and cost-effective option. This is typical for surface-level pitting on driveways, sidewalks, or patios.
Replacement becomes necessary when the damage is structural. Signs include spalling over more than half the slab depth, widespread rebar corrosion, or damage that compromises the slab’s ability to carry weight. If the slab is also cracked, heaving, or sinking, patching is just a temporary band-aid. For critical structural elements like foundation walls or support columns, always consult a professional like Omega2000 immediately.
Tools and Materials Needed for DIY Repair
Gathering the right gear before you start is half the battle. For a basic surface patch, you won’t need heavy machinery, but you do need quality materials suited for Calgary’s environment. Using a generic, non-modified patching compound is a recipe for a failed repair come next spring.
Your shopping list should include safety gear, demolition tools, cleaning supplies, and the right patching product. Investing in a high-quality, polymer-modified concrete patching compound and a liquid bonding agent is non-negotiable for a lasting fix.
| Item | Purpose | Estimated Cost (CAD) |
|---|---|---|
| Safety Glasses, Gloves, & Dust Mask | Protection from concrete chips and silica dust | $25 – $40 |
| Chisel & Hammer or Small Electric Chipping Hammer | To remove all loose and unsound concrete | $30 – $150 (rental) |
| Wire Brush, Stiff Broom, and Shop Vac | For thorough cleaning of the repair area | $40 – $80 |
| Concrete Bonding Agent (Liquid) | Ensures the new patch bonds chemically to the old concrete | $20 – $50 per quart |
| Polymer-Modified Concrete Patching Compound | The repair material; flexible and durable for our climate | $40 – $80 per bag |
| Mason’s Trowel, Margin Trowel, and Float | For applying, shaping, and smoothing the patch | $30 – $60 |
| Concrete Cure & Seal or Plastic Sheeting | To slow moisture loss and ensure proper curing | $20 – $50 |
Step-by-Step Guide to Repairing Spalling Concrete
Now, let’s walk through the repair process. Rushing or skipping steps is the most common reason DIY patches fail. Patience and preparation are your best tools. Follow this sequence for a repair that will stand up to Chinook winds and deep freezes alike.
Step 1: Prepare the Surface and Remove Loose Concrete

Your goal is to get down to solid, sound concrete. Put on your safety gear and use a hammer and chisel or an electric chipping hammer to break away all the loose, flaky, and crumbling material. Don’t be timid—you need to remove everything that doesn’t sound solid when tapped.
Undercut the edges of the repair area slightly. This means chiseling so the hole is wider at the bottom than at the top. This creates a mechanical “lock” for the new patch material, preventing it from popping out. If you hit rebar, chip back until you have at least 3/4 inch of clearance around the steel.
Skipping this step means your patch will only be bonded to already-failing concrete, guaranteeing a quick failure.
Step 2: Clean the Repair Area Thoroughly
After chipping, the area will be full of dust and debris, which acts like a barrier. First, sweep out all the large chunks. Then, attack it with a stiff wire brush to scrub the sides and bottom of the cavity. This removes the weak “laitance” or dust layer on the old concrete.
Finally, use a shop vacuum to suck out every last speck of dust. For the absolute best bond, follow up by blowing out the hole with compressed air. The surface should be absolutely clean and dry before moving on. Any dust or moisture left behind will severely weaken the bond.
Step 3: Treat Corroded Reinforcing Steel
If your spalling has exposed rebar, this step is critical. Use your wire brush to scrub all the loose rust and scale off the steel until you see bright, bare metal. It needs to be clean and sound for the repair to last.
Once clean, immediately apply a rust-inhibiting primer or a passivating gel designed for concrete repair. This coating stops active corrosion and prevents it from starting again under your new patch. Never patch over rusty rebar—the corrosion will continue and blow the new repair apart in a season or two.
Step 4: Apply Bonding Agent or Tack Coat
This is the “glue” for your repair. Following the manufacturer’s instructions, apply a liquid bonding agent to all the exposed concrete surfaces in your repair cavity. Use a brush to coat it evenly, including the undercut sides.
There are two main types: “prime and patch” where you let it get tacky, and “mix-in” types that you add to your patching compound’s mixing water. The prime-and-patch type is often more forgiving for DIYers. The key is to apply the patch material while the bonding agent is still tacky, not wet or dry.
Step 5: Mix and Apply Repair Mortar or Patch Compound
Now, mix your patching compound. Use clean, cold water and follow the bag’s water-to-mix ratio exactly. Adding too much water is a fatal error—it weakens the final product and causes shrinkage cracks. Mix only as much as you can apply in 20-30 minutes, as this material sets quickly.
Start applying the mix with a margin trowel, pushing it firmly into the cavity to eliminate air pockets. Pack it in layers if the hole is deep, pressing each layer firmly before adding the next. Overfill the hole slightly above the surrounding surface to allow for compaction and finishing.
Step 6: Resurface or Patch the Damaged Area
Once the cavity is packed, switch to a larger mason’s trowel. Begin to level the material with the existing surface. Use a sawing motion across the patch to help consolidate the material and bring the fine paste to the surface for finishing.
The goal here is to get the patch level and even with the old concrete. Don’t worry about a perfect finish yet; focus on getting the right height and removing any major highs or lows. Check your work by laying a straight-edge (like a 2×4) across the repair.
Step 7: Smooth, Feather, and Form Edges
As the patch begins to stiffen (when it can withstand light finger pressure without marking), it’s time for the final finish. Use your steel trowel to smooth the surface in circular motions, applying light pressure. This closes any small pores and creates a dense surface.
Pay special attention to the edges. Gently feather the new material out onto the old concrete so there’s no abrupt lip or ridge. A smooth transition is crucial for both appearance and preventing water from catching on the edge. You can match textures like broom finish at this stage.
Step 8: Cure and Protect the Repair
Curing is not drying—it’s a chemical process that requires moisture. If the patch dries out too fast, it will be weak and crack. Immediately after finishing, spray the area lightly with a curing compound or cover it with plastic sheeting for at least 24-48 hours.
Keep it protected from foot traffic, rain, and sun for a minimum of three days, and ideally a full week for maximum strength. This slow, moist cure is what allows the patch to develop the durability needed to survive its first Calgary winter.
Neglecting the cure is like baking a cake and pulling it out of the oven halfway through.
Repair Methods for Different Levels of Damage
Not all spalling is created equal. The approach you take should match the severity of the damage you uncovered during your assessment. Using a surface patch on a deep structural problem is a waste of time and money.
Surface Patching for Minor Spalling
For shallow damage less than 1/2 inch deep—common on weathered steps or patio edges—a simple cementitious patching compound applied with a trowel is sufficient. The key is still in the prep: clean, bond, and cure. These products are often pre-mixed and sand-based, making them easy for small jobs in communities like McKenzie Towne.
Resurfacing for Moderate Damage
When spalling affects a larger, contiguous area but the base slab is solid, a full resurfacing is the answer. This involves applying a thin (1/4 to 1/2 inch) layer of a specialized overlay or micro-topping across the entire slab. It’s more involved than patching but gives a uniform, new surface perfect for driveways or pool decks.
Full Replacement for Severe Spalling
When damage is deep, widespread, or involves structural compromise, patching is a temporary fix at best. Full replacement involves breaking out and removing the old slab, re-preparing the base, and pouring new concrete. This is a job for professionals, especially for load-bearing slabs in commercial settings or heavily used home driveways.
Sealing and Waterproofing to Prevent Future Spalling
Once your repair is fully cured, the job isn’t over. The final, crucial step is to protect it. Apply a high-quality penetrating silane/siloxane sealer to the entire concrete surface, not just the patch. This type of sealer soaks in and lines the pores, causing water to bead up and roll off without trapping moisture inside.
For Calgary conditions, choose a breathable sealer that repels water but allows water vapor from inside the slab to escape. Reapply the sealer every 2-3 years, or as recommended by the manufacturer, to maintain protection. This simple maintenance step is your best defense against the next round of freeze-thaw damage.
Tips for Long-Term Prevention and Maintenance
An ounce of prevention is worth a pound of cure, especially with concrete. Start by managing water. Ensure the ground slopes away from your concrete slabs so water drains off, not toward them. Keep expansion joints clear of dirt and vegetation to allow the concrete to expand and contract without cracking.
In winter, use sand or a non-chloride ice melt for traction instead of rock salt. If you must use salt, apply it sparingly and sweep away excess once the ice has melted. Regularly inspect your concrete in the spring and fall, looking for new cracks or signs of sealing failure, and address them immediately.
Proper Drainage, Joints, and Sealant Application
These three elements work together. Good drainage moves water away. Properly maintained control joints give stress a predetermined place to crack harmlessly. A fresh sealant locks everything down by keeping water out of the concrete’s pores in the first place.
Make a seasonal checklist: clear debris from drains and joints in the spring, inspect and clean surfaces in the summer, and reapply sealant in the early fall before the first frost hits the ground in communities like Coventry Hills.
FAQ
Here are the most common questions Calgary homeowners have about tackling concrete spalling.
Can I repair spalling concrete myself, or should I always hire a pro?
You can definitely handle minor to moderate surface spalling as a DIY project if you’re comfortable with the tools and follow the steps meticulously. The repair area should be less than a few square feet and not involve structural elements. For anything larger, where rebar is heavily corroded, or on critical surfaces like a foundation, calling a professional like Omega2000 is the smart, safe choice to ensure a permanent fix.
The biggest DIY pitfalls are improper preparation and using the wrong materials. If you’re unsure about the depth or cause of the damage, getting a professional assessment can save you from an expensive do-over.
What is the average cost to repair spalling concrete in Calgary?
Costs vary widely based on the method. A DIY surface patch for a small area might cost $100-$300 in materials. For professional repair, expect to pay between $300 and $800 for a standard driveway or patio patch, depending on size and complexity. Full-depth repair or resurfacing of an entire driveway can range from $1,500 to $4,000 or more.
The key is that professional repair, while a higher upfront cost, often comes with a multi-year warranty and the assurance it was done to withstand our local climate. Always get a detailed, written quote that includes surface prep, materials, and labour.
How long does a concrete spalling repair last?
A high-quality repair, done with proper preparation and the right polymer-modified materials, should last as long as the original concrete—often 10 years or more. Its lifespan directly correlates to the quality of the installation and the ongoing maintenance, especially sealing.
In Calgary, the true test is surviving 5-10 full freeze-thaw cycles. A cheap, poorly bonded patch might fail in a single season, while a professional-grade repair on a home in Edgemont should last for decades with proper care. The longevity justifies investing in the process, not just the quickest fix.
Will the patch color match my existing concrete?
An exact color match is very difficult to achieve. New cement is a different age and composition than old concrete, and it will weather differently. The goal of a functional repair is strength and a smooth surface, not invisibility.
For the best visual blend, professionals often feather the edges expertly and may use integral color or a surface stain on the patch after it cures. For large resurfacing projects, they overlay the entire slab for a uniform appearance. For most driveway or walkway patches, a close gray tone that blends over time is a perfectly acceptable outcome.
Conclusion
Repairing spalling concrete is a systematic process of removal, preparation, bonding, application, and protection. From identifying the early signs on your Sundance patio to executing a durable patch on your garage floor, each step builds on the last to create a long-lasting repair. The most critical phases are the ones you don’t see: the deep cleaning and proper curing.
While a small repair is within reach for a handy homeowner, larger areas or structural concerns demand professional expertise to ensure the job stands up to our harsh Calgary climate. Using the right materials and methods from the start prevents the frustration of having to redo the work next season.
Follow these steps and you’ll be set—or let the local experts at Omega2000 handle it. If you’re looking at spalling concrete and want a guaranteed repair, reaching out for a professional assessment is the best first step toward a permanent solution.